P14J предоставляет серию триггеров, которые могут выполнять действия на пины GPIO на основе изменения состояния другого пина. Триггеры также предоставляют расширяемый интерфейс, который позволяет расширять и создавать собственные пользовательские триггеры.
Триггеры GpioBlinkStateTrigger и GpioBlinkStopStateTrigger
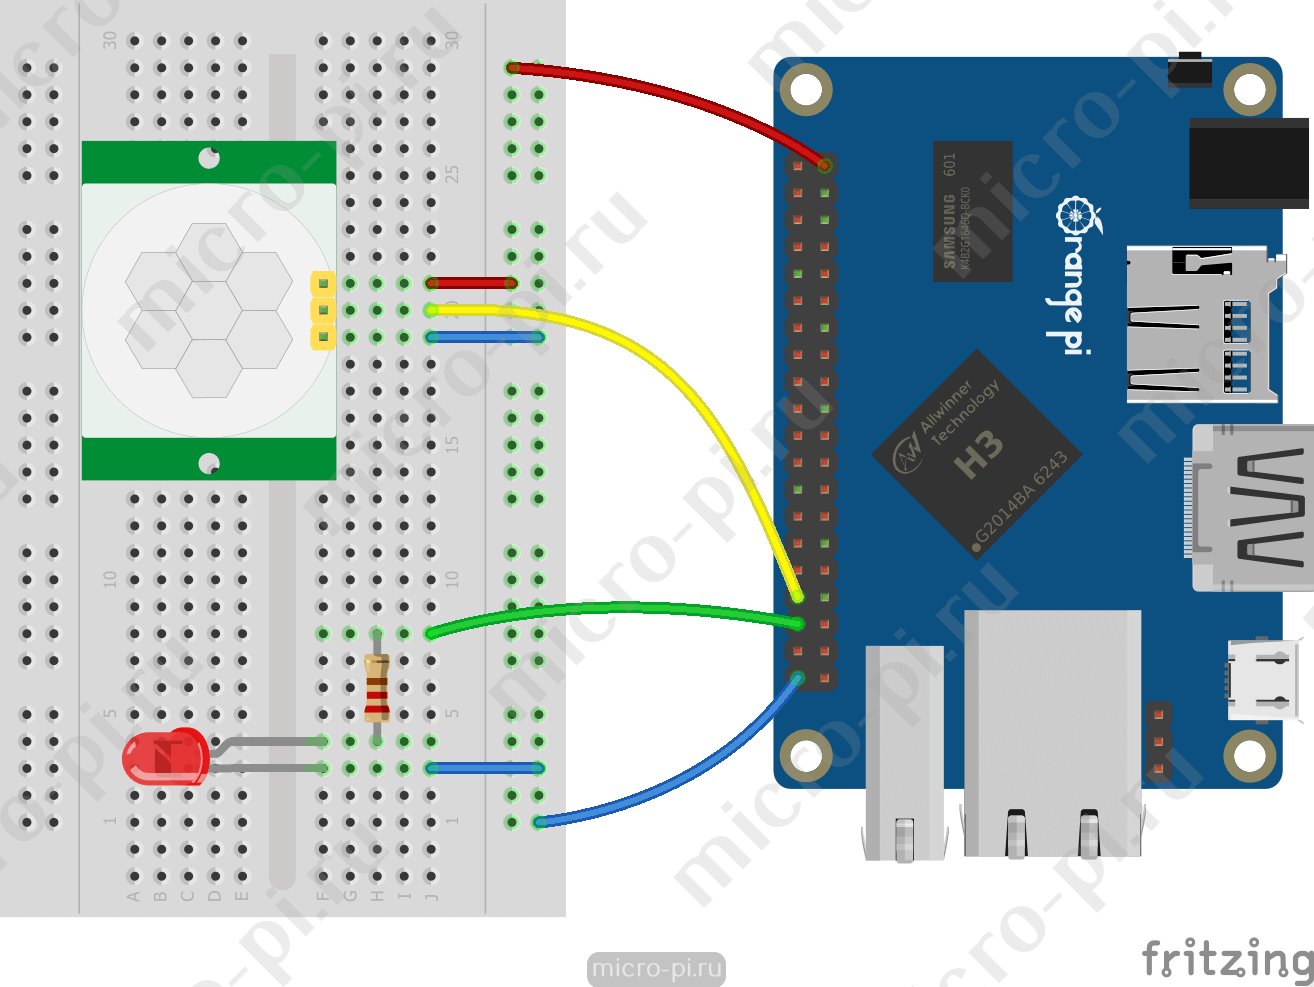
Триггеры GpioBlinkStateTrigger и GpioBlinkStopStateTrigger используются для включения и, соответственно, выключения мигания на пины GPIO. К примеру, мы хотим подключить датчик движения (к примеру HC-SR501) и светодиод, мигать им, когда датчик обнаружит движение и выключить мигание в противном случае.
Схема подключения
Код программы
В этом примере кода показано, как настроить и использовать мигающие триггеры GpioBlinkStateTrigger и GpioBlinkStopStateTrigger для контактов GPIO на Orange Pi. Триггер GpioBlinkStateTrigger мигает светодиодом «myLed» с интервалом в 100 мс, когда на пин «myButton» меняется состояние из «0» в «1», а GpioBlinkStopStateTrigger отключает мигание, когда состояние переходит из «1» в «0».
import com.pi4j.io.gpio.GpioController;
import com.pi4j.io.gpio.GpioFactory;
import com.pi4j.io.gpio.GpioPinDigitalInput;
import com.pi4j.io.gpio.GpioPinDigitalOutput;
import com.pi4j.io.gpio.OrangePiPin;
import com.pi4j.io.gpio.PinMode;
import com.pi4j.io.gpio.PinPullResistance;
import com.pi4j.io.gpio.PinState;
import com.pi4j.io.gpio.trigger.GpioBlinkStateTrigger;
import com.pi4j.io.gpio.trigger.GpioBlinkStopStateTrigger;
import com.pi4j.platform.Platform;
import com.pi4j.platform.PlatformManager;
import com.pi4j.util.Console;

public class PushButtonGpioBlinkStateTrigger {
  public static void main(String[] args) {
    try {
      /*
       * Поскольку мы не используем платформу Raspberry Pi, мы должны явно
       * указывать платформу, в нашем случае - это Orange Pi.
       */
      PlatformManager.setPlatform(Platform.ORANGEPI);
      /*
       * Создаём экземпляр консоли
       */
      Console console = new Console();
      /*
       * Позволяем пользователю выйти из программы с помощью CTRL-C
       */
      console.promptForExit();
      /*
       * Создаём экземпляр контроллера GPIO
       */
      GpioController gpio = GpioFactory.getInstance();
      /*
       * настройка вывода GPIO.22, задаём режим входа и включаем подтягивающий
       * резистор в "1"
       */
      GpioPinDigitalInput myButton = gpio.provisionDigitalInputPin(
          OrangePiPin.GPIO_23, // Номер пина по WiringPi
          "HC-SR501", // Имя пина (необязательный)
          PinPullResistance.PULL_UP);
      /*
       * настроика поведения выключения
       */
      myButton.setShutdownOptions(
          true, // освобождаем пин
          PinState.LOW, // задаём состояние 0
          PinPullResistance.OFF, // отключаем подтягивающий резистор
          PinMode.DIGITAL_INPUT);// установливаем режим входа
      /*
       * настройка вывода GPIO.24, задаём режим выхода и установливаем значение
       * LOW при запуске
       */
      GpioPinDigitalOutput myLed = gpio.provisionDigitalOutputPin(
          OrangePiPin.GPIO_24, // Номер пина по WiringPi
          "Светодиод", // Имя пина (необязательный)
          PinState.LOW); // Состояние пина при запуске (необязательный)
      /*
       * настроика поведения выключения
       */
      myLed.setShutdownOptions(
          true, // освобождаем пин
          PinState.LOW, // задаём состояние 0
          PinPullResistance.OFF, // отключаем подтягивающий резистор
          PinMode.DIGITAL_INPUT);// установливаем режим входа
      /*
       * добавляем триггер, который мигает светодиодом "myLed" с интервалом в
       * 100 мс. Триггер срабатывает, когда на пин myButton меняется состояние
       * из "0" в "1"
       */
      myButton.addTrigger(new GpioBlinkStateTrigger(PinState.HIGH, myLed, 100));
      /*
       * добавляем триггер, который отключает мигание. Триггер срабатывает,
       * когда на пин myButton меняется состояние из "1" в "0"
       */
      myButton.addTrigger(new GpioBlinkStopStateTrigger(PinState.LOW, myLed));
      /*
       * ждёт, пока пользователь нажмёт CTRL-C
       */
      console.waitForExit();
      gpio.shutdown();
    } catch (Exception e) {
      e.printStackTrace();
    }
  }
}
Проверяем код:
- создаём java файл и вставляем код;
nano PushButtonGpioBlinkStateTrigger.java
- компилируем файл;
javac -classpath .:classes:/opt/pi4j/lib/'*' PushButtonGpioBlinkStateTrigger.java
- запускаем программу.
sudo java -classpath .:classes:/opt/pi4j/lib/'*' PushButtonGpioBlinkStateTrigger
Результат

Триггер GpioToggleStateTrigger
Триггер GpioToggleStateTrigger используется для изменения состояния GPIO пинов на противоположное. Если выходной пин в состоянии «1», при срабатывании триггера (к примеру нажали на кнопку) состояние пина меняется в лог. «0» и на оборот, если пин в состоянии «0» — тогда менится в лог. «1». Срабатывание триггера GpioToggleStateTrigger можно настроить тремя способами:
- при переходе из «1» в «0» —
new GpioToggleStateTrigger(PinState.LOW, myLed); - при переходе из «0» в «1» —
new GpioToggleStateTrigger(PinState.HIGH, myLed); - любое изменение состояния —
new GpioToggleStateTrigger(myLed);
Чтобы проверить как GpioToggleStateTrigger работает, мы можем подключить кнопку и светодиод как показано на схеме ниже и выполнить приведённый код программы.
Схема подключения

Код программы
В этом примере показано, как настроить и использовать триггер GpioToggleStateTrigger. Триггер включает и выключает светодиод если нажимать на кнопку, т.е. когда пин «myButton» меняет состояние из «1» в «0».
import com.pi4j.io.gpio.GpioController;
import com.pi4j.io.gpio.GpioFactory;
import com.pi4j.io.gpio.GpioPinDigitalInput;
import com.pi4j.io.gpio.GpioPinDigitalOutput;
import com.pi4j.io.gpio.OrangePiPin;
import com.pi4j.io.gpio.PinMode;
import com.pi4j.io.gpio.PinPullResistance;
import com.pi4j.io.gpio.PinState;
import com.pi4j.io.gpio.trigger.GpioToggleStateTrigger;
import com.pi4j.platform.Platform;
import com.pi4j.platform.PlatformManager;
import com.pi4j.util.Console;

public class PushButtonGpioToggleStateTrigger {
  public static void main(String[] args) {
    try {
      /*
       * Поскольку мы не используем платформу Raspberry Pi, мы должны явно
       * указывать платформу, в нашем случае - это Orange Pi.
       */
      PlatformManager.setPlatform(Platform.ORANGEPI);
      /*
       * Создаём экземпляр консоли
       */
      Console console = new Console();
      /*
       * Позволяем пользователю выйти из программы с помощью CTRL-C
       */
      console.promptForExit();
      /*
       * Создаём экземпляр контроллера GPIO
       */
      GpioController gpio = GpioFactory.getInstance();
      /*
       * настройка вывода GPIO.22, задаём режим входа и включаем подтягивающий
       * резистор в "1"
       */
      GpioPinDigitalInput myButton = gpio.provisionDigitalInputPin(
          OrangePiPin.GPIO_22, // Номер пина по WiringPi
          "Кнопка", // Имя пина (необязательный)
          PinPullResistance.PULL_UP);
      /*
       * настроика поведения выключения
       */
      myButton.setShutdownOptions(
          true, // освобождаем пин
          PinState.LOW, // задаём состояние 0
          PinPullResistance.OFF, // отключаем подтягивающий резистор
          PinMode.DIGITAL_INPUT);// установливаем режим входа
      /*
       * настройка вывода GPIO.24, задаём режим выхода и установливаем значение
       * LOW при запуске
       */
      GpioPinDigitalOutput myLed = gpio.provisionDigitalOutputPin(
          OrangePiPin.GPIO_24, // Номер пина по WiringPi
          "Светодиод", // Имя пина (необязательный)
          PinState.LOW); // Состояние пина при запуске (необязательный)
      /*
       * настроика поведения выключения
       */
      myLed.setShutdownOptions(
          true, // освобождаем пин
          PinState.LOW, // задаём состояние 0
          PinPullResistance.OFF, // отключаем подтягивающий резистор
          PinMode.DIGITAL_INPUT);// установливаем режим входа
      /*
       * добавляем триггер, который включает и отключает светодиодом "myLed".
       * Триггер срабатывает при нажатии кнопки (когда на пин "myButton"
       * меняется состояние из "1" в "0")
       */
      myButton.addTrigger(new GpioToggleStateTrigger(PinState.LOW, myLed));
      /*
       * ждёт, пока пользователь нажмёт CTRL-C
       */
      console.waitForExit();
      gpio.shutdown();
    } catch (Exception e) {
      e.printStackTrace();
    }
  }
}
Проверяем код:
- создаём java файл и вставляем код;
nano PushButtonGpioToggleStateTrigger.java
- компилируем файл;
javac -classpath .:classes:/opt/pi4j/lib/'*' PushButtonGpioToggleStateTrigger.java
- запускаем программу.
sudo java -classpath .:classes:/opt/pi4j/lib/'*' PushButtonGpioToggleStateTrigger
Результат
Триггеры GpioSyncStateTrigger и GpioInverseSyncStateTrigger
Триггеры GpioSyncStateTrigger (также называется «follow-me») и GpioInverseSyncStateTrigger можно использовать для синхронизации и, соответственно, обратной синхронизации состояния одного пина с другим. GpioSyncStateTrigger работает по принципу «делай как я», т.е. если на входном пине менится состояние из «1» в «0», на выходном также менится. GpioInverseSyncStateTrigger работает по принципу «делай наоборот», если на входном пине состояние менится из «0» в «1», на выходном менится из «1» в «0».
Схема подключения

Код программы
Следующий пример демонстрирует простую реализацию триггера «follow-me» (следи за мной). При нажатии кнопки загорается синий светодиод, а при отжатии — красный.
import com.pi4j.io.gpio.GpioController;
import com.pi4j.io.gpio.GpioFactory;
import com.pi4j.io.gpio.GpioPinDigitalInput;
import com.pi4j.io.gpio.GpioPinDigitalOutput;
import com.pi4j.io.gpio.OrangePiPin;
import com.pi4j.io.gpio.PinMode;
import com.pi4j.io.gpio.PinPullResistance;
import com.pi4j.io.gpio.PinState;
import com.pi4j.io.gpio.trigger.GpioSyncStateTrigger;
import com.pi4j.io.gpio.trigger.GpioInverseSyncStateTrigger;
import com.pi4j.platform.Platform;
import com.pi4j.platform.PlatformManager;
import com.pi4j.util.Console;

public class PushButtonGpioInverseSyncStateTrigger {
  public static void main(String[] args) {
    try {
      /*
       * Поскольку мы не используем платформу Raspberry Pi, мы должны явно
       * указывать платформу, в нашем случае - это Orange Pi.
       */
      PlatformManager.setPlatform(Platform.ORANGEPI);
      /*
       * Создаём экземпляр консоли
       */
      Console console = new Console();
      /*
       * Позволяем пользователю выйти из программы с помощью CTRL-C
       */
      console.promptForExit();
      /*
       * Создаём экземпляр контроллера GPIO
       */
      GpioController gpio = GpioFactory.getInstance();
      /*
       * настройка вывода GPIO.22, задаём режим входа и включаем подтягивающий
       * резистор в "1"
       */
      GpioPinDigitalInput myButton = gpio.provisionDigitalInputPin(
          OrangePiPin.GPIO_22, // Номер пина по WiringPi
          "Кнопка", // Имя пина (необязательный)
          PinPullResistance.PULL_UP);
      /*
       * настроика поведения выключения
       */
      myButton.setShutdownOptions(
          true, // освобождаем пин
          PinState.LOW, // задаём состояние 0
          PinPullResistance.OFF, // отключаем подтягивающий резистор
          PinMode.DIGITAL_INPUT);// установливаем режим входа
      /*
       * настройка вывода GPIO.24, задаём режим выхода и установливаем значение
       * LOW при запуске
       */
      GpioPinDigitalOutput redLed = gpio.provisionDigitalOutputPin(
          OrangePiPin.GPIO_24, // Номер пина по WiringPi
          "Светодиод", // Имя пина (необязательный)
          PinState.LOW); // Состояние пина при запуске (необязательный)
      /*
       * настроика поведения выключения
       */
      redLed.setShutdownOptions(
          true, // освобождаем пин
          PinState.LOW, // задаём состояние 0
          PinPullResistance.OFF, // отключаем подтягивающий резистор
          PinMode.DIGITAL_INPUT);// установливаем режим входа
      /*
       * настройка вывода GPIO.23, задаём режим выхода и установливаем значение
       * LOW при запуске
       */
      GpioPinDigitalOutput blueLed = gpio.provisionDigitalOutputPin(
          OrangePiPin.GPIO_23, // Номер пина по WiringPi
          "Светодиод", // Имя пина (необязательный)
          PinState.LOW); // Состояние пина при запуске (необязательный)
      /*
       * настроика поведения выключения
       */
      blueLed.setShutdownOptions(
          true, // освобождаем пин
          PinState.LOW, // задаём состояние 0
          PinPullResistance.OFF, // отключаем подтягивающий резистор
          PinMode.DIGITAL_INPUT);// установливаем режим входа
      /*
       * добавляем триггер, который синхронизирует состояние пина GPIO.24 с
       * обратным состоянием пина GPIO.22
       */
      myButton.addTrigger(new GpioSyncStateTrigger(redLed));
      /*
       * добавляем триггер, который синхронизирует состояние пина GPIO.23 с
       * состоянием пина GPIO.22
       */
      myButton.addTrigger(new GpioInverseSyncStateTrigger(blueLed));

      /*
       * ждёт, пока пользователь нажмёт CTRL-C
       */
      console.waitForExit();
      gpio.shutdown();
    } catch (Exception e) {
      e.printStackTrace();
    }
  }
}
Проверяем код:
- создаём java файл и вставляем код;
nano PushButtonGpioInverseSyncStateTrigger.java
- компилируем файл;
javac -classpath .:classes:/opt/pi4j/lib/'*' PushButtonGpioInverseSyncStateTrigger.java
- запускаем программу.
sudo java -classpath .:classes:/opt/pi4j/lib/'*' PushButtonGpioInverseSyncStateTrigger
Результат
Триггер GpioPulseStateTrigger
Триггер GpioPulseStateTrigger используются для отправки импульсов на пины GPIO на определённое время. Срабатывание триггера GpioPulseStateTrigger можно настроить тремя способами:
- при переходе из «1» в «0» —
new GpioPulseStateTrigger(PinState.LOW, myLed, 1000); - при переходе из «0» в «1» —
new GpioPulseStateTrigger(PinState.HIGH, myLed, 1000); - любое изменение состояния —
new GpioPulseStateTrigger(myLed, 1000);
Схема подключения
Код программы
В этом примере я добавил два триггера GpioPulseStateTrigger, чтобы при нажатии на кнопку (переход из «1» в «0») загорелся красный светодиод, а при отжатии (переход из «0» в «1») — синий. Оба светодиода будут гореть по 1000 мс.
import com.pi4j.io.gpio.GpioController;
import com.pi4j.io.gpio.GpioFactory;
import com.pi4j.io.gpio.GpioPinDigitalInput;
import com.pi4j.io.gpio.GpioPinDigitalOutput;
import com.pi4j.io.gpio.OrangePiPin;
import com.pi4j.io.gpio.PinMode;
import com.pi4j.io.gpio.PinPullResistance;
import com.pi4j.io.gpio.PinState;
import com.pi4j.io.gpio.trigger.GpioPulseStateTrigger;
import com.pi4j.platform.Platform;
import com.pi4j.platform.PlatformManager;
import com.pi4j.util.Console;

public class PushButtonGpioPulseStateTrigger {
  public static void main(String[] args) {
    try {
      /*
       * Поскольку мы не используем платформу Raspberry Pi, мы должны явно
       * указывать платформу, в нашем случае - это Orange Pi.
       */
      PlatformManager.setPlatform(Platform.ORANGEPI);
      /*
       * Создаём экземпляр консоли
       */
      Console console = new Console();
      /*
       * Позволяем пользователю выйти из программы с помощью CTRL-C
       */
      console.promptForExit();
      /*
       * Создаём экземпляр контроллера GPIO
       */
      GpioController gpio = GpioFactory.getInstance();
      /*
       * настройка вывода GPIO.22, задаём режим входа и включаем подтягивающий
       * резистор в "1"
       */
      GpioPinDigitalInput myButton = gpio.provisionDigitalInputPin(
          OrangePiPin.GPIO_22, // Номер пина по WiringPi
          "Кнопка", // Имя пина (необязательный)
          PinPullResistance.PULL_UP);
      /*
       * настроика поведения выключения
       */
      myButton.setShutdownOptions(
          true, // освобождаем пин
          PinState.LOW, // задаём состояние 0
          PinPullResistance.OFF, // отключаем подтягивающий резистор
          PinMode.DIGITAL_INPUT);// установливаем режим входа
      /*
       * настройка вывода GPIO.24, задаём режим выхода и установливаем значение
       * LOW при запуске
       */
      GpioPinDigitalOutput redLed = gpio.provisionDigitalOutputPin(
          OrangePiPin.GPIO_24, // Номер пина по WiringPi
          "Светодиод", // Имя пина (необязательный)
          PinState.LOW); // Состояние пина при запуске (необязательный)
      /*
       * настроика поведения выключения
       */
      redLed.setShutdownOptions(
          true, // освобождаем пин
          PinState.LOW, // задаём состояние 0
          PinPullResistance.OFF, // отключаем подтягивающий резистор
          PinMode.DIGITAL_INPUT);// установливаем режим входа
      /*
       * настройка вывода GPIO.23, задаём режим выхода и установливаем значение
       * LOW при запуске
       */
      GpioPinDigitalOutput blueLed = gpio.provisionDigitalOutputPin(
          OrangePiPin.GPIO_23, // Номер пина по WiringPi
          "Светодиод", // Имя пина (необязательный)
          PinState.LOW); // Состояние пина при запуске (необязательный)
      /*
       * настроика поведения выключения
       */
      blueLed.setShutdownOptions(
          true, // освобождаем пин
          PinState.LOW, // задаём состояние 0
          PinPullResistance.OFF, // отключаем подтягивающий резистор
          PinMode.DIGITAL_INPUT);// установливаем режим входа
      /*
       * добавляем триггер, который включает красный светодиодом "redLed" на
       * 1000 мс. Триггер срабатывает, когда пин "myButton" меняет состояние из
       * "1" в "0"
       */
      myButton.addTrigger(new GpioPulseStateTrigger(PinState.LOW, redLed, 1000));
      /*
       * добавляем триггер, который включает синий светодиодом "blueLed" на 1000
       * мс. Триггер срабатывает, когда пин "myButton" меняет состояние из "0" в
       * "1"
       */
      myButton.addTrigger(new GpioPulseStateTrigger(PinState.HIGH, blueLed, 1000));

      /*
       * ждёт, пока пользователь нажмёт CTRL-C
       */
      console.waitForExit();
      gpio.shutdown();
    } catch (Exception e) {
      e.printStackTrace();
    }
  }
}
Проверяем код:
- создаём java файл и вставляем код;
nano PushButtonGpioPulseStateTrigger.java
- компилируем файл;
javac -classpath .:classes:/opt/pi4j/lib/'*' PushButtonGpioPulseStateTrigger.java
- запускаем программу.
sudo java -classpath .:classes:/opt/pi4j/lib/'*' PushButtonGpioPulseStateTrigger
Результат
Триггер GpioSetStateTrigger
С помощью триггера GpioSetStateTrigger можно задать состояние GPIO пинам. Его можно настроить, чтобы срабатывал при переходе из лог. «0» в лог. «1» (и наоборот) и задал «0» или «1» (PinState.LOW или PinState.HIGH) на другой пин.
Схема подключения
Код программы
В этом примере я добавил два триггера GpioSetStateTrigger, чтобы при нажатии на кнопку светодиод включился, а при отжатии — отключился.
import com.pi4j.io.gpio.GpioController;
import com.pi4j.io.gpio.GpioFactory;
import com.pi4j.io.gpio.GpioPinDigitalInput;
import com.pi4j.io.gpio.GpioPinDigitalOutput;
import com.pi4j.io.gpio.OrangePiPin;
import com.pi4j.io.gpio.PinMode;
import com.pi4j.io.gpio.PinPullResistance;
import com.pi4j.io.gpio.PinState;
import com.pi4j.io.gpio.trigger.GpioSetStateTrigger;
import com.pi4j.platform.Platform;
import com.pi4j.platform.PlatformManager;
import com.pi4j.util.Console;

public class PushButtonGpioSetStateTrigger {
  public static void main(String[] args) {
    try {
      /*
       * Поскольку мы не используем платформу Raspberry Pi, мы должны явно
       * указывать платформу, в нашем случае - это Orange Pi.
       */
      PlatformManager.setPlatform(Platform.ORANGEPI);
      /*
       * Создаём экземпляр консоли
       */
      Console console = new Console();
      /*
       * Позволяем пользователю выйти из программы с помощью CTRL-C
       */
      console.promptForExit();
      /*
       * Создаём экземпляр контроллера GPIO
       */
      GpioController gpio = GpioFactory.getInstance();
      /*
       * настройка вывода GPIO.22, задаём режим входа и включаем подтягивающий
       * резистор в "1"
       */
      GpioPinDigitalInput myButton = gpio.provisionDigitalInputPin(
          OrangePiPin.GPIO_22, // Номер пина по WiringPi
          "Кнопка", // Имя пина (необязательный)
          PinPullResistance.PULL_UP);
      /*
       * настроика поведения выключения
       */
      myButton.setShutdownOptions(
          true, // освобождаем пин
          PinState.LOW, // задаём состояние 0
          PinPullResistance.OFF, // отключаем подтягивающий резистор
          PinMode.DIGITAL_INPUT);// установливаем режим входа
      /*
       * настройка вывода GPIO.24, задаём режим выхода и установливаем значение
       * LOW при запуске
       */
      GpioPinDigitalOutput redLed = gpio.provisionDigitalOutputPin(
          OrangePiPin.GPIO_24, // Номер пина по WiringPi
          "Светодиод", // Имя пина (необязательный)
          PinState.LOW); // Состояние пина при запуске (необязательный)
      /*
       * настроика поведения выключения
       */
      redLed.setShutdownOptions(
          true, // освобождаем пин
          PinState.LOW, // задаём состояние 0
          PinPullResistance.OFF, // отключаем подтягивающий резистор
          PinMode.DIGITAL_INPUT);// установливаем режим входа
      /*
       * добавляем триггер, который включает красный светодиодом "redLed".
       * Триггер срабатывает, когда пин "myButton" меняет состояние из "0" в "1"
       */
      myButton.addTrigger(new GpioSetStateTrigger(PinState.LOW, redLed, PinState.LOW));
      /*
       * добавляем триггер, который отключает красный светодиодом "redLed".
       * Триггер срабатывает, когда пин "myButton" меняет состояние из "1" в "0"
       */
      myButton.addTrigger(new GpioSetStateTrigger(PinState.HIGH, redLed, PinState.HIGH));

      /*
       * ждёт, пока пользователь нажмёт CTRL-C
       */
      console.waitForExit();
      gpio.shutdown();
    } catch (Exception e) {
      e.printStackTrace();
    }
  }
}
Проверяем код:
- создаём java файл и вставляем код;
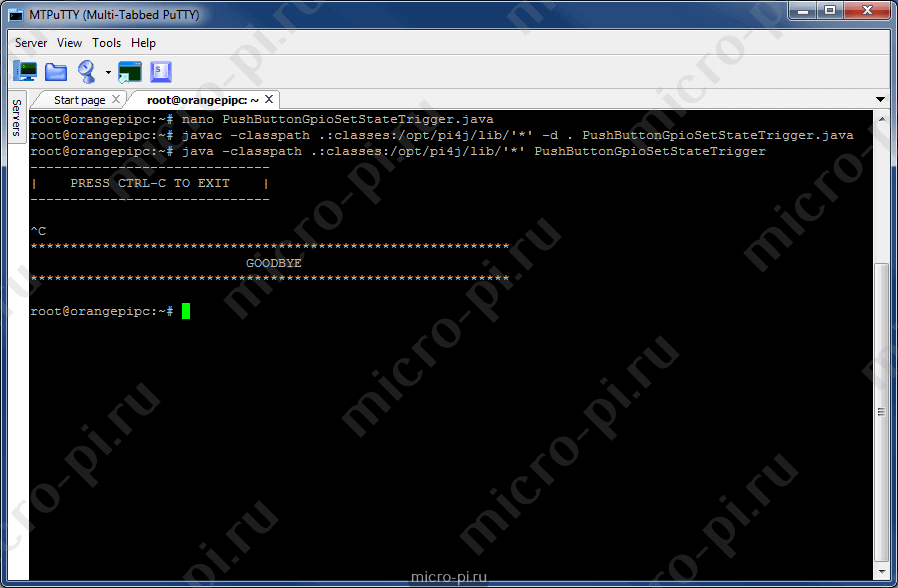
nano PushButtonGpioSetStateTrigger.java
- компилируем файл;
javac -classpath .:classes:/opt/pi4j/lib/'*' PushButtonGpioSetStateTrigger.java
- запускаем программу.
sudo java -classpath .:classes:/opt/pi4j/lib/'*' PushButtonGpioSetStateTrigger
Результат
Триггер GpioCallbackTrigger
Если вам нужно выполнять какую-то задачу при нажатии кнопки, тогда вы можете использовать триггер GpioCallbackTrigger. Срабатывание триггера можно настроить тремя способами:
- при переходе из «1» в «0»
new GpioCallbackTrigger(PinState.LOW, new Callable<Void>() { public Void call() throws Exception { System.out.println(" --> GPIO 0 "); return null; } }); - при переходе из «0» в «1»
new GpioCallbackTrigger(PinState.HIGH, new Callable<Void>() { public Void call() throws Exception { System.out.println(" --> GPIO 1 "); return null; } }); - любое изменение состояния
new GpioCallbackTrigger(new Callable<Void>() {
  public Void call() throws Exception {
    System.out.println(" --> GPIO 0 | 1 ");
    return null;
  }
});
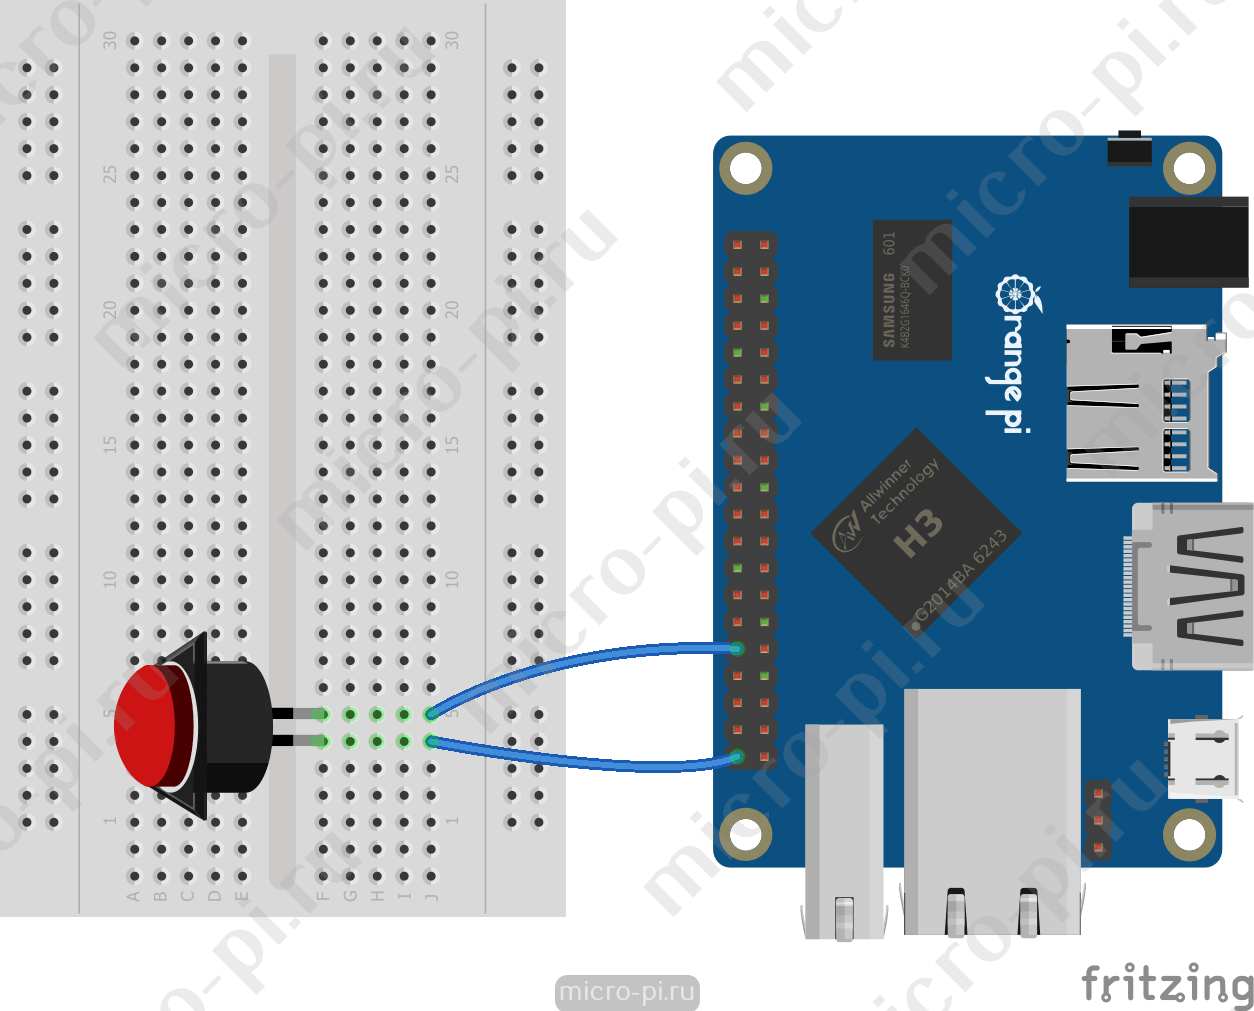
Схема подключения
Код программы
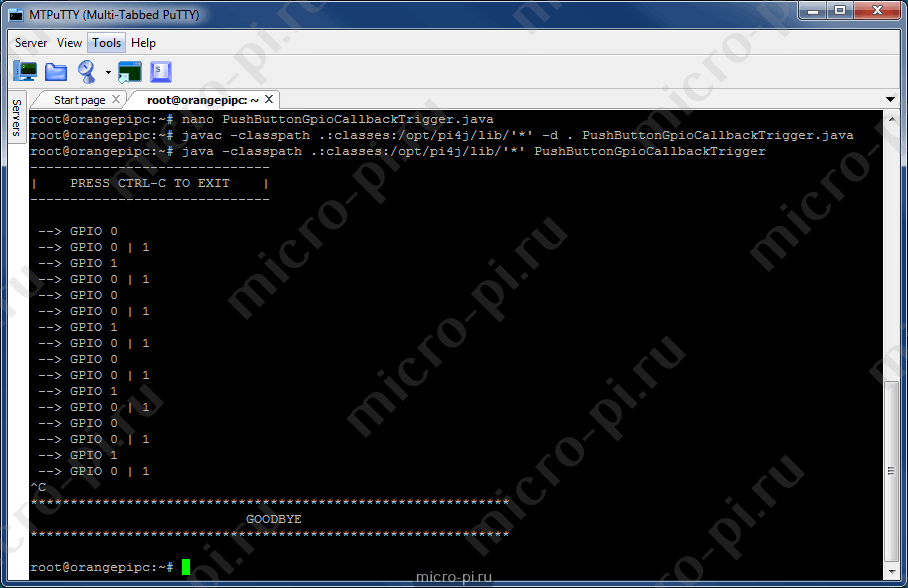
Этот пример выводит в консоль текст при нажатии/отжатии кнопки.
import java.util.concurrent.Callable;

import com.pi4j.io.gpio.GpioController;
import com.pi4j.io.gpio.GpioFactory;
import com.pi4j.io.gpio.GpioPinDigitalInput;
import com.pi4j.io.gpio.OrangePiPin;
import com.pi4j.io.gpio.PinMode;
import com.pi4j.io.gpio.PinPullResistance;
import com.pi4j.io.gpio.PinState;
import com.pi4j.io.gpio.trigger.GpioCallbackTrigger;
import com.pi4j.platform.Platform;
import com.pi4j.platform.PlatformManager;
import com.pi4j.util.Console;

public class PushButtonGpioCallbackTrigger {
  public static void main(String[] args) {
    try {
      /*
       * Поскольку мы не используем платформу Raspberry Pi, мы должны явно
       * указывать платформу, в нашем случае - это Orange Pi.
       */
      PlatformManager.setPlatform(Platform.ORANGEPI);
      /*
       * Создаём экземпляр консоли
       */
      Console console = new Console();
      /*
       * Позволяем пользователю выйти из программы с помощью CTRL-C
       */
      console.promptForExit();
      /*
       * Создаём экземпляр контроллера GPIO
       */
      GpioController gpio = GpioFactory.getInstance();
      /*
       * настройка вывода GPIO.22, задаём режим входа и включаем подтягивающий
       * резистор в "1"
       */
      GpioPinDigitalInput myButton = gpio.provisionDigitalInputPin(
          OrangePiPin.GPIO_22, // Номер пина по WiringPi
          "Кнопка", // Имя пина (необязательный)
          PinPullResistance.PULL_UP);
      /*
       * настроика поведения выключения
       */
      myButton.setShutdownOptions(
          true, // освобождаем пин
          PinState.LOW, // задаём состояние 0
          PinPullResistance.OFF, // отключаем подтягивающий резистор
          PinMode.DIGITAL_INPUT);// установливаем режим входа
      /*
       * добавляем триггер, который выполняет задачу, когда на пин "myButton"
       * меняется состояние из "0" в "1"
       */
      myButton.addTrigger(new GpioCallbackTrigger(PinState.HIGH, new Callable<Void>() {
        public Void call() throws Exception {
          System.out.println(" --> GPIO 1 ");
          return null;
        }
      }));
      /*
       * добавляем триггер, который выполняет задачу, когда на пин "myButton"
       * меняется состояние из "1" в "0"
       */
      myButton.addTrigger(new GpioCallbackTrigger(PinState.LOW, new Callable<Void>() {
        public Void call() throws Exception {
          System.out.println(" --> GPIO 0 ");
          return null;
        }
      }));
      /*
       * добавляем триггер, который выполняет задачу, когда на пин "myButton"
       * меняется состояние
       */
      myButton.addTrigger(new GpioCallbackTrigger(new Callable<Void>() {
        public Void call() throws Exception {
          System.out.println(" --> GPIO 0 | 1 ");
          return null;
        }
      }));
      /*
       * ждёт, пока пользователь нажмёт CTRL-C
       */
      console.waitForExit();
      gpio.shutdown();
    } catch (Exception e) {
      e.printStackTrace();
    }
  }
}
Проверяем код:
- создаём java файл и вставляем код;
nano PushButtonGpioCallbackTrigger.java
- компилируем файл;
javac -classpath .:classes:/opt/pi4j/lib/'*' PushButtonGpioCallbackTrigger.java
- запускаем программу.
sudo java -classpath .:classes:/opt/pi4j/lib/'*' PushButtonGpioCallbackTrigger
Результат
Надеюсь данные примеры будут вам полезны. Если возникнут какие-то вопросы, пишите, буду рад вам помочь.